Go Build Cross Tools

As those who write multi-platform applications will attest, configuring a reliable cross-development environment on Windows can be a chore. If you're developing a native app that leverages other open source libraries, you've chosen a path that will challenge even the most patient of Zen masters.

Compilers/assemblers/linkers. Headers. Libraries. Build tools. Required source tweaks. Library version linking issues. Upstream maintainers with bad attitudes immune to your best cajoling. Absurdly clueless decisions by tool suppliers a la Microsoft's removal of the command line tools from the Windows 8 SDK after finally doing the right thing years ago with the Visual C++ Toolkit 2003. Great, what started as a challenging adventure quickly turned into a grinding slog-fest through a tarpit infested with brambly roadblocks and fun-sucking vampires.

But, Don Quixote de la MultiPlatform, all is not hopeless. Go to the rescue.

This post is targeted to quickly getting you set up and productive on a Windows development system simply because it has been such a fight in the past. However, thanks to the hard work of the Go contributors, setting up a multi-platform development system on Windows, Linux, OS X and other platforms is simple. As such, all of the info shared below is applicable to building multi-platform Go development environments on non-Windows platforms.

Get and Build Go

The first step toward Go development nirvana is to get a local copy of Go's Mercurial repo via

C:\Apps>hg clone https://code.google.com/p/go/ go-hg

C:\Apps>cd go-hg && hg sum
parent: 16706:37bf155bc780 tip
 cmd/5g, cmd/6g, cmd/8g: more nil ptr to large struct checks
branch: default
commit: 3 unknown (clean)
update: (current)

One of the many fantastic features of Go is that Go provides its own multi-platform capable compilers and tools. Even more fantastic is that both the toolchain and the Go environment are easily built on Windows 32/64-bit systems with just a simple MinGW gcc setup.

I've built Go with a number of different MinGW flavors including the 32 and 64-bit gcc 4.8.0 mingw-w64 flavors. In all cases, the build experience has been painless. When I've run into issues, the committers have been fast and easy to work with.

Automating Your Cross Builds

One of the most valuable gifts you can give your hacking self is to automate your build workflows so you can stay in the zone. This task is often a tooth pulling experience, but not with Go. Go's default build helpers work equally well on Linux, Windows, and OS X.

While the Go install documentation shows how to build the Go environment from source, I chose to create the following PowerShell helper to automate building my Go environment to support 32-bit Windows, Linux, and OS X platforms. I use a slightly more complex version on my Windows 8 system to build for 32/64-bit Linux, Windows, and OS X platforms.

# file: build_all.ps1

$toolkit = 'C:\DevKit-mb4.8.0\mingw\bin'
$targets = 'windows:386:1', 'linux:386:0', 'darwin:386:0'

$orig_path = $env:PATH
$env:PATH = "$toolkit;$env:PATH"

Push-Location src
  $targets | % {
    $env:GOOS, $env:GOARCH, $env:CGO_ENABLED = $_.Split(':')
    switch ($env:CGO_ENABLED) {
      '0' { $cmd = 'make.bat --no-clean' }
      '1' { $cmd = 'all.bat' }
    }

    Write-Host "`n---> building for $env:GOOS/$env:GOARCH platform`n" `
               -foregroundcolor yellow
    Invoke-Expression ".\$cmd"
  }
Pop-Location

$env:PATH = $orig_path

If you're stuck with using .bat files, here's a helper to get you started.

:: file: build_all.bat

@echo off
setlocal ENABLEEXTENSIONS ENABLEDELAYEDEXPANSION

set DEVTOOLSDIR=C:\DevKit-mb4.8.0\mingw\bin
set PATH=%DEVTOOLSDIR%;%PATH%

pushd src

  echo.
  echo ---^> building Go for windows 386
  echo.
  set GOOS=windows
  set GOARCH=386
  set CGO_ENABLED=1
  call all.bat

  echo.
  echo ---^> building Go for linux 386
  echo.
  set GOOS=linux
  set CGO_ENABLED=0
  call make.bat --no-clean

  echo.
  echo ---^> building Go for darwin 386
  echo.
  set GOOS=darwin
  call make.bat --no-clean

popd

Go Build Multi-platform Apps

Now that you've created a reliable, multi-platform Go development environment, it's almost embarassing how easy it is to build Go applications that run on Windows, Linux and OS X systems.

In a future post I'll go into more details of other Go goodies such as Go's #ifdef killer build contraints. For now, here's a simple Ruby Rakefile showing how easy it is to build multi-platform Go apps using the GOOS and GOARCH environment variables, and the go command line tool.

require 'rake/clean'
require 'rbconfig'

# --- BUILD CONFIGURATION ---
UPX_EXE = 'C:/Apps/upx/bin/upx.exe'
S7ZIP_EXE = 'C:/tools/7za.exe'
# ---------------------------

task :default => :all

ARCH = ENV['GOARCH'] || '386'
BUILD = 'build'
PKG = File.expand_path('pkg')

CLEAN.include(BUILD)
CLOBBER.include(PKG)


def dev_null
  if RbConfig::CONFIG['host_os'] =~ /mingw|mswin/
    'NUL'
  else
    '/dev/null'
  end
end

desc 'build all OS/arch flavors'
task :all => %W[build:windows_#{ARCH} build:linux_#{ARCH} build:darwin_#{ARCH}]

namespace :all do
  desc 'build and shrink all exes'
  task :shrink => [:all] do
    Dir.chdir BUILD do
      Dir.glob('*').each do |d|
        Dir.chdir d do
          Dir.glob('uru*').each do |f|
            puts "---> upx shrinking #{d} #{f}"
            system "#{UPX_EXE} -9 #{f} > #{dev_null} 2>&1"
          end
        end
      end
    end
  end
end

namespace :build do
  %W[windows:#{ARCH}:0 linux:#{ARCH}:0 darwin:#{ARCH}:0].each do |tgt|
    os, arch, cgo = tgt.split(':')
    ext = (os == 'windows' ? '.exe' : '')

    desc "build #{os}/#{arch}"
    task :"#{os}_#{arch}" do |t|
      puts "---> building uru #{os}_#{arch} flavor"
      ENV['GOARCH'] = arch
      ENV['GOOS'] = os
      ENV['CGO_ENABLED'] = cgo
      system "go build -o #{BUILD}/#{t.name.split(':')[-1]}/uru_rt#{ext}"
    end
  end
end

desc 'archive all built exes'
task :package => 'package:all'

directory PKG
namespace :package do
  task :all => ['all:shrink',PKG] do
    ts = Time.now.strftime('%Y%m%dT%H%M')
    Dir.chdir BUILD do
      Dir.glob('*').each do |d|
        case d
        when /\A(darwin|linux)/
          puts "---> packaging #{d}"
          system "#{S7ZIP_EXE} a -tgzip -mx9 uru-#{$1}-#{ts}-bin-x86.gz ./#{d}/*  > #{dev_null} 2>&1"
          mv "uru-#{$1}-#{ts}-bin-x86.gz", PKG, :verbose => false
        when /\Awindows/
          puts "---> packaging #{d}"
          system "#{S7ZIP_EXE} a -t7z -mx9 uru-windows-#{ts}-bin-x86.7z ./#{d}/* > #{dev_null} 2>&1"
          mv "uru-windows-#{ts}-bin-x86.7z", PKG, :verbose => false
        end
      end
    end
  end
end

Conclusion

As the Go team prepares to release 1.1, it's a great time to dig into the details of how Go can make your multi-platform hacking a lot nicer. It's obvious that the team is both experienced and refreshingly pragmatic in their approach to providing a great environment for quickly building multi-platform apps. Go take advantage of their hard work and expertise!
 
Ubuntu Server VM Console Tweaks

As technologists, we're blessed with a wealth of interesting and useful tools these days. One of my favorites is the VirtualBox virtualization product from Oracle. It runs on a variety of host platforms including Windows, Linux, and Mac and enables one to easily run another guest operating system. I use VirtualBox to run Arch Linux, Ubuntu Server, and Snow Leopard on my Windows 7 and 8 hobby hacking notebooks.

I could prattle on about why every self respecting developer should do the same, but that's a ditty for another time. Today I'm going to show you one way to fix the puny default command line UI of a fresh Ubuntu Server installation on VirtualBox.

On most modern systems, when you fire up a freshly installed console-based VM, you're greated by a tiny little window and terrible looking fonts. If you installed a GUI-based VM, you can change the default graphics behavior by building and installing the Guest Additions.

But how do you change things on a console-based VM? There are a number of ways (setupcon in .profile, deprecated vga kernel boot parameter, etc) but I'm going to show you a more elegant way using grub and an updated initial RAM disk.

Update Grub

I'll assume you've already installed a Ubuntu Server 12.10 VM and are sitting at the shell prompt.

First, configure grub (actually grub2) to use a different display resolution and grow the tiny VirtualBox VM window by editing grub's defaults and compiling a new /boot/grub/grub.cfg. On my Windows 8 64bit host system, setting GRUB_GFXMODE=1024x768x24 was the perfect size. You may need to drop into grub's shell and run vbeinfo to find your systems supported graphic modes.

jon@ubusvr64:~$ sudo vim /etc/default/grub
# modify the following configuration variable
    GRUB_GFXMODE=1024x768x24
jon@ubusvr64:~$ sudo update-grub

Update the Initial RAM Disk

Next, update your console setup and init RAMdisk environment to use a better looking font. You'll tweak a couple configuration variables, copy the desired font to the correct location, and update the current init RAMdisk. As my console uses CODESET=Lat15, I chose the TerminusBold font sized at 24x12.

jon@ubusvr64:~$ sudo vim /etc/default/console-setup
# modify the following configuration variables
    FONTFACE="TerminusBold"
    FONTSIZE="24x12"
jon@ubusvr64:~$ sudo cp /usr/share/consolefonts/Lat15-TerminusBold24x12.psf.gz /etc/console-setup
jon@ubusvr64:~$ cd /etc/console-setup && sudo gzip -d Lat15-TerminusBold24x12.psf.gz
jon@ubusvr64:~$ sudo update-initramfs -u
jon@ubusvr64:~$ sudo reboot

Conclusion

As you can see, this was a fairly painless yet elegant way to save your eyes when using a console-based Ubuntu Server VM via VirtualBox. If you've discovered a cleaner solution, drop me an email.

 
The DevKit Loves libxml2

After an 18 month slumber, libxml2 snapped awake, downed a few Irish coffee's, and recently pushed out a 2.8.0 release.

I just read your mind.

"I wish Jon would write a short post on how to build libxml2 from source on Windows using the DevKit."

Bored stiff with your real work I see. Remember, work? The thing you do to fund your debaucheries and sundry bad habits?

But who am I to stand in the way of a bit of slacky hacking. Thankfully, there's just three trivial steps thanks to the work of the libxml2 contributors:

  1. Build or download a DevKit.
  2. Download the libxml source via FTP.
  3. Build and test.

Get an Edgy DevKit and libxml2-2.8.0

For the fiendishly edgy, clone the RubyInstaller repo and build a mingw-w64, gcc 4.7.1 DevKit with rake devkit sfx=1 dkver=mingw64-32-4.7.1. Run rake devkit:ls if you want a list of available DevKit's to build.

For the mildly edgy, download a mingw, gcc 4.6.2 DevKit from TheCodeShop downloads page.

Next, download the libxml2 2.8.0 source tarball and extract it to a location that contains no spaces in the pathname. C:\temp\libxml2-2.8.0 looks just fine.

Build and Test

Although 2.8.0 added lzma compression support, I've gone the way of the Luddite and slavishly stuck with just zlib support.

If you don't already have the zlib dev headers/libraries, you can always build libxml2 without zlib support by passing the ./configure script --without-zlib instead of --with-zlib=c:/path/to/zlib/devstuff. Or if you really want zlib support, scan this RubyInstaller ML post and see what interesting URLs you discover.

I'll swing back and update the post once I've toyed with the new lzma capability.

c:\temp\libxml2-2.8.0>\DevKit-4.7.1\devkitvars.bat
Adding the DevKit to PATH...

# formatted for post...use a single command line when building
C:\temp\libxml2-2.8.0>sh -c "./configure --prefix=c:/devlibs/libxml2-2.8.0 \
                            --with-zlib=c:/devlibs/zlib-1.2.7 \
                            --without-iconv --without-docbook"

checking build system type... i686-pc-mingw32
checking host system type... i686-pc-mingw32
...
checking for ld used by gcc... c:/devkit-4.7.1/mingw/i686-w64-mingw32/bin/ld.exe
...
Checking zlib
checking zlib.h usability... yes
checking zlib.h presence... yes
checking for zlib.h... yes
checking for gzread in -lz... yes
...
checking lzma.h presence... no
...
checking whether to enable IPv6... no
...
Found Python version 2.7
could not find python2.7/Python.h or /include/Python.h
./configure: line 14262: python2.7-config: command not found
Checking configuration requirements
Enabling multithreaded support
Disabling Docbook support
Disabling ICONV support
Disabling ICU support
Enabled Schematron support
Enabled Schemas/Relax-NG support
...
Done configuring

C:\temp\libxml2-2.8.0>make
...
make[1]: Leaving directory `/c/temp/libxml2-2.8.0'

To test the libxml2 API using the generated testapi.exe helper, first, add the following file to the C:\temp\libxml2-2.8.0 source directory.

<!-- file: gatolog.xml -->

<catalog xmlns="urn:oasis:names:tc:entity:xmlns:xml:catalog">

  <system systemId="http://www.w3.org/TR/xhtml1/DTD/xhtml1-strict.dtd"
    uri="dtd/xhtml1/xhtml1-strict.dtd"/>
 
  <system systemId="http://www.w3.org/TR/xhtml1/DTD/xhtml1-transitional.dtd"
    uri="dtd/xhtml1/xhtml1-transitional.dtd"/>
 
  <system systemId="http://www.w3.org/TR/xhtml11/DTD/xhtml11.dtd"
    uri="dtd/xhtml11/xhtml11-flat.dtd"/>

</catalog>

Finally, grab a cup of Rishi Masala Chai tea, set an env var, and fire off the API tests.

C:\temp\libxml2-2.8.0>set XML_CATALOG_FILES=C:/temp/libxml2-2.8.0/gatolog.xml

C:\temp\libxml2-2.8.0>testapi.exe
Testing HTMLparser : 32 of 38 functions ...
Testing HTMLtree : 18 of 18 functions ...
Testing SAX2 : 38 of 38 functions ...
...
Testing nanoftp : 14 of 22 functions ...
Testing nanohttp : 13 of 17 functions ...
Testing parser : 61 of 70 functions ...
Testing parserInternals : 33 of 90 functions ...
...
Testing relaxng : 14 of 24 functions ...
...
Testing xmlIO : 39 of 48 functions ...
...
Testing xmlreader : 76 of 86 functions ...
...
Testing xmlschemas : 15 of 25 functions ...
Testing xmlschemastypes : 26 of 34 functions ...
...
Testing xmlwriter : 51 of 79 functions ...
Testing xpath : 30 of 38 functions ...
Testing xpathInternals : 106 of 117 functions ...
Testing xpointer : 17 of 21 functions ...
Total: 1161 functions, 291375 tests, 0 errors

 
Cross compiling mruby

Update: my CMake prototype mentioned in this post has been accepted into the mainstream mruby codebase. You no longer need to use my prototype branch; original instructions have been modified appropriately.

In my last post I showed you how to get started with mruby by using my CMake prototype to build mruby on a variety of different Windows and Unix-like platforms. In this post I'm going to give you a whirlwind tour on how to build an mruby on Ubuntu 12.04 that runs on Windows systems.

Don't worry, it won't hurt. Cross compiling is a fairly painless process these days thanks to the amazing work of a number of pioneering hackers. Assuming your system is setup from my last post, you're just a few steps away from cross compiling mruby for Windows:

  1. Install a pre-built cross compiling toolchain
  2. Update your local clone of the mruby repo
  3. Hope that I hid the nasty build complexities behind a simple interface

A Quick Review

Before diving into cross compiling, let's quickly review how to natively build mruby on either a Windows, Linux, or OS X system. Once you've fetched updates from the mruby repo, change to a build directory different from mruby's root dir (hint: use the cleverly named build subdir) and type a command similar to one of the following to configure and build:

  • Unix-like: cmake .. then make
  • Windows with MSYS/MinGW: cmake -G "MSYS Makefiles" .. then make
  • Windows with MinGW: cmake -G "MinGW Makefiles" .. then mingw32-make
  • Windows with MSVC+NMake: cmake -G "NMake Makefiles" .. then nmake
  • Windows with Visual Studio 10: cmake -G "Visual Studio 10" ..

CMake lets you do interesting things during the configuration stage such as telling it where to install mruby. CMake command line variables modify the configuration phase and are used similar to cmake -G "MSYS Makefiles" -D CMAKE_INSTALL_PREFIX=C:/Devlibs/mruby ..

CMake relies on the concept of "generators" that take a set of abstract build instructions, and create platform specific build and project files. Type cmake --help to see the other generators supported on your platform, selectable via the -G option. For example, on Windows, CMake supports Visual Studio 10 Win64, CodeBlocks - MinGW Makefiles, and others.

Finally, the generated Makefiles support other useful targets like make install, make package, make test, and make clean. Type make help to see the full list of targets.

Moving on...

Get a Cross Compiling Toolchain

Most of the popular Linux distributions have a number of different cross compiler toolchains sitting in their package repositories ready for you to painlessly install. For this post, as we're only interested in cross toolchains targeting Windows systems, I'll use one of the MinGW toolchains installed via something similar to sudo pacman -S mingw32-gcc or sudo apt-get install mingw-w64 g++-mingw-w64.

I don't currently use OS X, but I understand that none of the popular Mac package repositories contain recent MinGW toolchains. Don't fret, the guys over at the mingw-w64 project provide Mac toolchains targeting 32 or 64bit Windows systems. Simply download, extract, and tweak your PATH.

Cross Compiling mruby

In the abstract, cross compiling is about bridging two different worlds by creating a small foundry in one world that builds things for use in the other world. Simple, eh?

Once you've properly installed the cross toolchain, the key challenge is to persuade your build environment to use the toolchain. The classic autotools infrastructure has sent a chill up the spine of many a hearty developer with it's --build, --host, and --target system triplet options. But we're using CMake, not autotools, so no worries.

We simply have to tell CMake to use a "toolchain file" to drive its configuration and Makefile generation. As a convenience, I've included toolchain sample files for cross compiling mruby for Windows from Arch Linux, Ubuntu, and OS X.

I'm building with Ubuntu, so I copied the Ubuntu toolchain sample to my home directory like so. You may need to tweak the settings to match your system and the specific cross toolchain you installed.

jon@ubusvr:~/cdev/mruby-git$ cp cmake/Toolchain-Ubuntu-mingw32.cmake.sample ~/crossdev/Toolchain-Ubuntu-mingw32.cmake

jon@ubusvr:~/cdev/mruby-git$ cat ~/crossdev/Toolchain-Ubuntu-mingw32.cmake
# Sample toolchain file for building for Windows from an Ubuntu Linux system.
#
# Typical usage:
#    1) install cross compiler: `sudo apt-get install mingw-w64 g++-mingw-w64`
#    2) cp cmake/Toolchain-Ubuntu-mingw32.cmake.sample ~/Toolchain-Ubuntu-mingw32.cmake
#    3) tweak toolchain values as needed
#    4) cd build
#    5) cmake -DCMAKE_TOOLCHAIN_FILE=~/Toolchain-Ubuntu-mingw32.cmake ..

# name of the target OS on which the built artifacts will run
# and the toolchain prefix
set(CMAKE_SYSTEM_NAME Windows)
set(TOOLCHAIN_PREFIX i686-w64-mingw32)

# cross compilers to use for C and C++
set(CMAKE_C_COMPILER ${TOOLCHAIN_PREFIX}-gcc)
set(CMAKE_CXX_COMPILER ${TOOLCHAIN_PREFIX}-g++)
set(CMAKE_RC_COMPILER ${TOOLCHAIN_PREFIX}-windres)

# target environment on the build host system
#   set 1st to dir with the cross compiler's C/C++ headers/libs
#   set 2nd to dir containing personal cross development headers/libs
set(CMAKE_FIND_ROOT_PATH /usr/${TOOLCHAIN_PREFIX} ~/crossdev/w32)

# modify default behavior of FIND_XXX() commands to
# search for headers/libs in the target environment and
# search for programs in the build host environment
set(CMAKE_FIND_ROOT_PATH_MODE_PROGRAM NEVER)
set(CMAKE_FIND_ROOT_PATH_MODE_LIBRARY ONLY)
set(CMAKE_FIND_ROOT_PATH_MODE_INCLUDE ONLY)

jon@ubusvr:~/cdev/mruby-git$

This sample assumes you've installed the mingw-w64 cross toolchain from the Ubuntu APT repositories. If you do need to tweak the toolchain file, in most cases you'll only need to modify the TOOLCHAIN_PREFIX variable and the CMAKE_FIND_ROOT_PATH variable.

Using the foundry analogy again, the TOOLCHAIN_PREFIX ensures you're using the right machines, and the CMAKE_FIND_ROOT_PATH tells CMake where to get the correct materials. In this case, the "materials" are the cross C/C++ headers/libraries and any other required 3rd party cross header/libraries. Currently, cross compiling mruby requires only the cross C/C++ headers and libraries provided by the installed cross toolchain.

Once you've got the proper toolchain file, you're ready to configure and build. Simply invoke cmake -D CMAKE_TOOLCHAIN_FILE=... then make similar to how you natively built mruby. The only difference from a native compile and a cross compile is that for cross compiles you invoke cmake with the CMAKE_TOOLCHAIN_FILE variable referring to the relevant toolchain file.

jon@ubusvr:~/cdev/mruby-git$ cd build && cmake -D CMAKE_TOOLCHAIN_FILE=~/crossdev/Toolchain-Ubuntu-mingw32.cmake ..
-- The C compiler identification is GNU 4.6.3
-- Check for working C compiler: /usr/bin/i686-w64-mingw32-gcc
-- Check for working C compiler: /usr/bin/i686-w64-mingw32-gcc -- works
-- Detecting C compiler ABI info
-- Detecting C compiler ABI info - done
-- Build type not set, defaulting to 'RelWithDebInfo'
-- Looking for string.h
-- Looking for string.h - found
-- Looking for float.h
-- Looking for float.h - found
-- Looking for gettimeofday
-- Looking for gettimeofday - found
-- Found BISON: /usr/bin/bison (found version "2.5")
-- Configuring done
-- Generating done
-- Build files have been written to: /home/jon/cdev/mruby-git/build

# cross compile for Windows and package into *.tar.gz and *.zip
jon@ubusvr:~/cdev/mruby-git/build$ make package
[  1%] [BISON][mruby] Building parser with bison 2.5
Scanning dependencies of target mruby_object
[  3%] Building C object src/CMakeFiles/mruby_object.dir/version.c.obj
...
Scanning dependencies of target mruby-native
[ 78%] Creating directories for 'mruby-native'
[ 80%] No download step for 'mruby-native'
[ 81%] No patch step for 'mruby-native'
[ 83%] No update step for 'mruby-native'
[ 85%] Performing configure step for 'mruby-native'
-- The C compiler identification is GNU 4.6.3
-- Check for working C compiler: /usr/bin/gcc
-- Check for working C compiler: /usr/bin/gcc -- works
...
-- Configuring done
-- Generating done
-- Build files have been written to: /home/jon/cdev/mruby-git/build/native
[ 86%] Performing build step for 'mruby-native'
[  1%] [BISON][mruby] Building parser with bison 2.5
Scanning dependencies of target mruby_object
[  3%] Building C object src/CMakeFiles/mruby_object.dir/version.c.o
...
[ 90%] Completed 'mruby-native'
[ 90%] Built target mruby-native
...
[ 98%] Built target mruby
Scanning dependencies of target mirb
[100%] Building C object tools/mirb/CMakeFiles/mirb.dir/mirb.c.obj
Linking C executable mirb.exe
[100%] Built target mirb
Run CPack packaging tool...
CPack: Create package using TGZ
CPack: Install projects
CPack: - Run preinstall target for: mruby
CPack: - Install project: mruby
CPack: Create package
CPack: - package: /home/jon/cdev/mruby-git/build/mruby-1.0.0dev-windows-mingw463.tar.gz generated.
CPack: Create package using ZIP
CPack: Install projects
CPack: - Run preinstall target for: mruby
CPack: - Install project: mruby
CPack: Create package
CPack: - package: /home/jon/cdev/mruby-git/build/mruby-1.0.0dev-windows-mingw463.zip generated.

As you can see, I ended up with mruby-1.0.0dev-windows-mingw463.tar.gz and mruby-1.0.0dev-windows-mingw463.zip binary archives in my build subdir ready to run on a Windows system.

A simple file double check shows that the native and cross executables were built correctly.

jon@ubusvr:~/cdev/mruby-git/build$ file tools/mruby/mruby.exe
tools/mruby/mruby.exe: PE32 executable (console) Intel 80386, for MS Windows

jon@ubusvr:~/cdev/mruby-git/build$ file native/tools/mruby/mruby
native/tools/mruby/mruby: ELF 32-bit LSB executable, Intel 80386,
  version 1 (SYSV), dynamically linked (uses shared libs), for GNU/Linux 2.6.24,
  BuildID[sha1]=0x7a42420e0f6fc21727ffedb2e5f35194d97136ba, not stripped

Conclusion

While the CMake prototype now appears to support both native and cross compiled mruby builds, it needs much more testing, especially in OS X and 64bit environments.

Kudos-in-advance to anyone getting it to cross compile for ARM from Ubuntu!

Try it out on systems you feel are important. If you discover problems or have suggestions for enhancements, submit an issue. If it works for you, let us know. Finally, if you're interested in moving this effort forward, jump in and fix one of the open issues; help is always appreciated.

 
CMake prototype for mruby

Update: my CMake prototype mentioned in this post has been accepted into the mainstream mruby codebase. You no longer need to use my prototype branch; original instructions have been modified appropriately.

With some help from @beoran and @bovi, I've turned a question about mruby build automation into a prototype that's almost ready to submit for review for inclusion into mruby. While a fair bit of work remains, the prototype is good enough that I'm pushing it out of the nest for further testing. I've used the prototype to successfully build mruby on the following 32bit systems:

  • Windows 7 with MSYS/MinGW GCC 4.6.2
  • Windows 7 with Clang 3.1 + MSYS/MinGW GCC 4.6.2
  • Windows 7 with MSYS/MinGW GCC 4.7.1
  • Windows 7 with Windows SDK 7.1 + nmake (thanks @nkshigeru)
  • Arch Linux 3.3.5 with GCC 4.7.0 20120505
  • Ubuntu 12.04 with GCC 4.6.3

And @bovi has successfully built mruby with CMake on OS X Lion using an earlier version of the prototype. Build success stories summarized here.

This post isn't a tutorial on CMake or how to embed mruby into another application, but rather, a jumpstart to get you up and running with a minimum amount of fuss.

Get Ready

There's only four requirements (OK, five if you count git) for building mruby using the CMake prototype:

  1. A working bison installation
  2. A GCC-based or Windows SDK 7.1 development toolchain
  3. A working CMake 2.8.8+ installation, and
  4. A local clone of the mruby repo.

For Windows hackers, the quickest way to get (1) and (2) is to download a self-extracting 32bit MSYS/MinGW 4.6.2 DevKit from TheCodeShop's Ruby downloads page. It's built from my RubyInstaller recipes and can be used standalone or integrated into one of your existing Rubies by following these instructions. If you're feeling edgy you can build your own DevKit by cloning the RubyInstaller repo and running my DevKit build recipe similar to rake devkit dkver=mingw64-32-4.7.1 sfx=1 from the root directory. Look in the pkg subdirectory for your freshly baked DevKit. Type rake devkit:ls to list the available DevKit flavors.

Builds using Windows SDK 7.1 and nmake compatible Makefiles generated by cmake -G "NMake Makefiles" .. also work.

For Unix-like and OS X hackers, life is much simpler as it's likely you have both (1) and (2) already installed on your system. If not, it's usually just a matter of eloquently conversing with your package manager. Something similar to sudo pacman -S gcc or sudo apt-get gcc. Sorry, I don't use OS X or speak MacPorts/Homebrew/Fink yet ;)

To install CMake 2.8.8+, Windows users should download and install a prebuilt binary. I extracted the cmake-2.8.8-win32-x86.zip archive into C:\Apps\cmake and created a cmakevars.bat helper to bring C:\Apps\cmake\bin onto my PATH rather than using the CMake installer. Unix-like users can speak nicely to their package manager, install the cmake-2.8.8-Linux-i386.tar.gz binary archive, or build CMake from source.

Finally, you need to clone the mruby GitHub source repository by doing something similar to the following. All examples will be shown on a Windows 7 system using an MSYS/MinGW toolchain.

C:\Users\Jon\Documents\RubyDev>git clone https://github.com/mruby/mruby.git mruby-git
...
C:\Users\Jon\Documents\RubyDev>cd mruby-git

Next, smoke test the setup and make sure you're ready to build.

# ALWAYS build outside the source tree!...we'll use the default `build` subdir
C:\Users\Jon\Documents\RubyDev\mruby-git>cd build

# make the GCC toolchain and bison available for use
C:\Users\Jon\Documents\RubyDev\mruby-git\build>\DevKit\devkitvars.bat
Adding the DevKit to PATH...

# ensure cmake is working
C:\Users\Jon\Documents\RubyDev\mruby-git\build>cmake --version
cmake version 2.8.8

Looks great. Time to see how CMake helps us build mruby.

Let's Go!

In this example, I'm overcomplicating things a bit by showing you how to instruct CMake to customize your build configuration by overriding CMake's CMAKE_C_COMPILER to use the clang compiler.

DO NOT use the sample command line as-is. On Windows systems use cmake -G "MSYS Makefiles .. to build with the DevKit's GCC. On Unix-like systems use cmake .. to build with the system GCC.

C:\Users\Jon\Documents\RubyDev\mruby-git\build>cmake -G "MSYS Makefiles" -DCMAKE_C_COMPILER=C:/clang/bin/clang.exe ..
-- The C compiler identification is Clang 3.1.0
-- Check for working C compiler: C:/clang/bin/clang.exe
-- Check for working C compiler: C:/clang/bin/clang.exe -- works
-- Detecting C compiler ABI info
-- Detecting C compiler ABI info - done
-- Build type not set, defaulting to 'RelWithDebInfo'
-- Found BISON: C:/DevKit/bin/bison.exe (found version "2.4.2")
-- Configuring done
-- Generating done
-- Build files have been written to: C:/Users/Jon/Documents/RubyDev/mruby-git/build

C:\Users\Jon\Documents\RubyDev\mruby-git\build>make
[  1%] [BISON][mruby] Building parser with bison 2.4.2
Scanning dependencies of target mruby_object
...

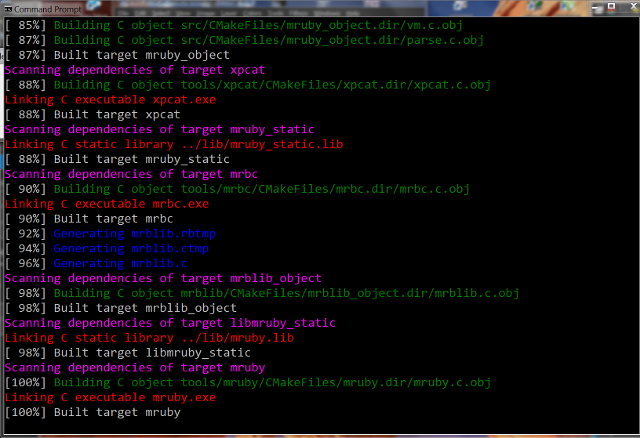
You should end up seeing colorful build messages scroll across your shell similar to the following:

CMake mruby build

Locally Install and Smoke Test

By default, CMake creates Makefiles that install the necessary mruby artifacts into your local mruby repo directory structure. Specifically, it installs the mrbc and mruby executables into bin, the static library libmruby.a into lib, and headers into include.

Nice, but how about we just install and smoke test mruby.exe by making it spit out a verbose hello mruby!?

C:\Users\Jon\Documents\RubyDev\mruby-git\build>make install
[ 87%] Built target mruby_object
[ 88%] Built target xpcat
[ 88%] Built target mruby_static
[ 90%] Built target mrbc
[ 98%] Built target mrblib_object
[ 98%] Built target libmruby_static
[100%] Built target mruby
Install the project...
-- Install configuration: "RelWithDebInfo"
-- Installing: C:/Users/Jon/Documents/RubyDev/mruby-git/lib/mruby.lib
-- Installing: C:/Users/Jon/Documents/RubyDev/mruby-git/bin/mrbc.exe
-- Installing: C:/Users/Jon/Documents/RubyDev/mruby-git/bin/mruby.exe

C:\Users\Jon\Documents\RubyDev\mruby-git\build>..\bin\mruby.exe -v -e "puts 'hello mruby!'"
ruby 1.8.7 (2010-08-16 patchlevel 302) [i386-mingw32]
NODE_SCOPE:
  local variables:
  NODE_BEGIN:
    NODE_CALL:
      NODE_SELF
      method='puts' (308)
      args:
        NODE_STR "hello mruby!" len 12
irep 115 nregs=4 nlocals=2 pools=1 syms=1
000 OP_LOADSELF R2
001 OP_STRING   R3      'hello mruby!'
002 OP_LOADNIL  R4
003 OP_SEND     R2      'puts'  1
004 OP_STOP

hello mruby!

The default install behavior can be modified when invoking cmake similar to cmake -G "MSYS Makefiles" -D CMAKE_INSTALL_PREFIX=C:/Devlibs/mruby ..

Because you built outside of the source tree in the build subdirectory, cleanup is as easy as deleting the build dir contents (except .gitkeep) via a rm -rf *.

That's a Wrap

What's that you say? You'd like all the goodies packaged up into *.tar.gz and *.zip's ready to distribute? Child's play.

C:\Users\Jon\Documents\RubyDev\mruby-git\build>make package
[ 87%] Built target mruby_object
[ 87%] Built target mruby_static
[ 88%] Built target mrbc
[ 90%] Built target xpcat
[ 98%] Built target mrblib_object
[ 98%] Built target libmruby_static
[100%] Built target mruby
Run CPack packaging tool...
CPack: Create package using TGZ
CPack: Install projects
CPack: - Run preinstall target for: MRUBY
CPack: - Install project: MRUBY
CPack: Create package
CPack: - package: C:/Users/Jon/Documents/RubyDev/mruby-git/build/mruby-0.1.1-win32.tar.gz generated.
CPack: Create package using ZIP
CPack: Install projects
CPack: - Run preinstall target for: MRUBY
CPack: - Install project: MRUBY
CPack: Create package
CPack: - package: C:/Users/Jon/Documents/RubyDev/mruby-git/build/mruby-0.1.1-win32.zip generated.

Things Left TODO

  • Refine and optimize the compiler and linker flags.
  • Add system introspection support for config.h while respecting cross compiling realities.
  • Add shared library build support in addition to the current static library build support.
  • Add CMake support for building mruby that's usable on at least one mobile or other embedded-like system.
  • Build and embedded runtime testing results from a variety of 64bit OS X, Linux, and Windows systems.

Conclusion

The CMake prototype, while not perfect, is solid enough to handle more testing in different build and runtime scenarios. Take it out for a spin and see how it works for you. If you discover problems, submit an issue. If you've got the time and interest, dive in and help fix one of the open issues that irritates you the most.

My goal is to refine the prototype just enough so that it reliably creates native builds on 32/64bit Windows (nmake, not MSVC IDE), Linux, and OS X systems. Once the prototype appears robust, I will bundle up the commits and submit a pull request for Matz to review.

If Matz agrees that a cross platform CMake build system adds value to mruby, further refinements and enhancements should happen as part of the official mruby repository rather than The CodeShop.

 
Hacking a RubyGem

Sometimes you need to quickly hack a RubyGem to do your bidding. You already know it's a terrible idea. You already know you should buck up and submit a patch to the gem's maintainer. But you just can't stop yourself from tweaking. Habits die hard.

The psych gem bundles up all the YAML goodness already available by default in the MRI Ruby 1.9 series. But, currently, installing the psych gem on Windows isn't as nice as it could be. Psych assumes you've already installed the libyaml development headers and libraries on your system, and it assumes you've made yaml.dll available on your %PATH% for runtime use.

As a Windows user, what you'd really like to do is gem install psych and have everything just work. But if installation was already that easy, there would be no point in this post would there?

So let's give psych a smarter brain that groks easier Windows installs. However, the real point is to show how easy it is to crack open an existing RubyGem and modify it to suit your needs. If you're a natural salesperson you'll try to sell this as "code reuse" rather than the lurking maintenance fiasco it really is.

Ready Dr. Frakenstein?

Get the Development Goodies

If you haven't done so already, download a DevKit MSYS/MinGW toolchain and inject its goodness into your Ruby by following these instructions. If you'd like to use GCC v4.6.2 I've added a build recipe to the RubyInstaller project. Simpy run rake devkit dkver=mingw-32-4.6.2 sfx=1 and look in the pkg subdirectory.

Next, you need the libyaml development headers and libraries. They're really easy to build from source using my libyaml-waf build recipe or you can download a pre-built binary from my GitHub repo. Extract the contents to c:\devlibs\libyaml.

Open up the RubyGem

Now, fetch the psych gem, extract its gemspec, and unpack everything into a work directory in preparation for modifying psych's internals.

C:\Users\Jon\Downloads\temp>gem fetch psych
Fetching: psych-1.2.2.gem (100%)
Downloaded psych-1.2.2

C:\Users\Jon\Downloads\temp>gem spec psych-1.2.2.gem --ruby > psych.gemspec

C:\Users\Jon\Downloads\temp>gem unpack psych-1.2.2.gem
Unpacked gem: 'C:/Users/Jon/Downloads/temp/psych-1.2.2'

C:\Users\Jon\Downloads\temp>move psych.gemspec psych-1.2.2
        1 file(s) moved.

C:\Users\Jon\Downloads\temp>cd psych-1.2.2

Hack the Internals

Now it's time to make psych smarter by tweaking how it's built. The idea is to update its extconf.rb to allow static linking to libyaml and update its version and build date information to minimize potential conflicts with the official psych releases.

First, patch the existing ext\psych\extconf.rb with:

diff --git a/ext/psych/extconf.rb b/ext/psych/extconf.rb
index fe7795f..772471a 100644
--- a/ext/psych/extconf.rb
+++ b/ext/psych/extconf.rb
@@ -17,6 +17,13 @@ end
 asplode('yaml.h')  unless find_header  'yaml.h'
 asplode('libyaml') unless find_library 'yaml', 'yaml_get_version'
 
+# --enable-static option statically links libyaml to psych
+# XXX only for *nix or MinGW build toolchains
+if ARGV.include?('--enable-static')
+  $libs.gsub!('-lyaml', '-Wl,-static -lyaml -Wl,-shared')
+  $defs.push('-DYAML_DECLARE_STATIC')
+end
+
 create_makefile 'psych'
 
 # :startdoc:

Next, update the version and date information in both psych.gemspec and lib\psych.rb.

# file: psych.gemspec
Gem::Specification.new do |s|
  s.name = "psych"
  s.version = "1.2.3.alpha.1"
  ...
  s.authors = ["Aaron Patterson"]
  s.date = "2012-02-24"
  ...
end

# file: lib\psych.rb
module Psych
  # The version is Psych you're using
  VERSION         = '1.2.3.alpha.1'
  ...
end

Build and Install

If all went well, we should be able to build our own little Fraken-psych and watch it successfully install. The key is to use --with-libyaml-dir and the new --enable-static options when you invoke gem install.

Let's flip the switch and see see what happens.

C:\Users\Jon\Downloads\temp\psych-1.2.2>gem build psych.gemspec
  Successfully built RubyGem
  Name: psych
  Version: 1.2.3.alpha.1
  File: psych-1.2.3.alpha.1.gem

C:\Users\Jon\Downloads\temp\psych-1.2.2>gem install psych-1.2.3.alpha.1.gem -- --with-libyaml-dir=c:\devlibs\libyaml --enable-static
Temporarily enhancing PATH to include DevKit...
Building native extensions.  This could take a while...
Successfully installed psych-1.2.3.alpha.1
1 gem installed

C:\Users\Jon\Downloads\temp\psych-1.2.2>gem list psych

*** LOCAL GEMS ***

psych (1.2.3.alpha.1)

It's Alive!

Time for a quicktest to see how it works. I use ripl but there's no reason you can't use good old irb. Note the use of gem psych before require psych in order to use our updated version of psych.

C:\Users\Jon\Downloads\temp\psych-1.2.2>ripl
>> gem 'psych'
=> true
>> require 'psych'
=> true
>> [ Psych::LIBYAML_VERSION, Psych::VERSION ]
=> ["0.1.4", "1.2.3.alpha.1"]
>> Psych.load "- this\n- is\n- an array\n- of strings"
=> ["this", "is", "an array", "of strings"]

That look's pretty good. But given that Aaron has spent time creating a large test suite, it would be a shame to quit at the quicktest. We're going to return to the work directory, build, copy the resulting psych.so to lib\psych, and run the official psych test suite. This example assumes the DevKit is installed in C:\DevKit.

C:\Users\Jon\Downloads\temp\psych-1.2.2>cd ext\psych

C:\Users\Jon\Downloads\temp\psych-1.2.2\ext\psych>\DevKit\devkitvars.bat
Adding the DevKit to PATH...

C:\Users\Jon\Downloads\temp\psych-1.2.2\ext\psych>ruby extconf.rb --with-libyaml-dir=c:\devlibs\libyaml --enable-static
extconf.rb:7: Use RbConfig instead of obsolete and deprecated Config.
checking for yaml.h... yes
checking for yaml_get_version() in -lyaml... yes
creating Makefile

C:\Users\Jon\Downloads\temp\psych-1.2.2\ext\psych>make
generating psych-i386-mingw32.def
compiling emitter.c
compiling parser.c
compiling psych.c
compiling to_ruby.c
compiling yaml_tree.c
linking shared-object psych.so

C:\Users\Jon\Downloads\temp\psych-1.2.2\ext\psych>xcopy psych.so ..\..\lib
C:psych.so
1 File(s) copied

C:\Users\Jon\Downloads\temp\psych-1.2.2\ext\psych>cd ..\..

C:\Users\Jon\Downloads\temp\psych-1.2.2>for %F in (test\psych\test_*.rb) do ruby -Ilib -Itest %F
...
C:\Users\Jon\Downloads\temp\psych-1.2.2>ruby -Ilib -Itest test\psych\test_yamldbm.rb
...

.....F............

Finished tests in 0.811202s, 22.1893 tests/s, 57.9387 assertions/s.

  1) Failure:
test_key(Psych::YAMLDBMTest) [test/psych/test_yamldbm.rb:80]:
<"a"> expected but was
.

18 tests, 47 assertions, 1 failures, 0 errors, 0 skips

Not perfect, but not bad. Only one of the official tests failed. Time to submit an issue to psych's GitHub issue tracker.

Conclusion

As you can see, it's straightforward to modify an existing RubyGem if need be. But while it may be easy to do, I don't recommend it for anything but experimentation. Take your hard work and wrap it up into a patch for the maintainers. You've got better things to do with your time than maintain a one-off fork and gem maintainers typically love contributions, especially those that fix problems or enhance usability.

 
Fenix Rises on Windows

Sometimes you discover people doing great work. And doing it with passion, skill, and a commitment to excellence. Fenix is a little nugget of software gold worthy of your attention, and worthy of your time to test and help refine.

The following snippet is not exactly what it does, but if you get the idea, do yourself a favor and run over to the Fenix source repo, clone it and start playing.

C:\Users\Jon\Documents>ripl
>> class File
 |   def self.expand_path(path, base='.')
 |     puts "Make mine faster with Win32 please."
 |   end
 | end
=> nil
>> File.expand_path '../my/cool/ruby/thing'
Make mine faster with Win32 please.

 
Profiling MinGW Apps - Part 1

If you've tried to profile Windows apps built with a MinGW toolkit you've likely run into a couple of problems. Either your profiler doesn't understand MinGW's debug symbols, or the profiler is so intrusive that you can't build the application you're trying to profile.

A number of well-known and useful profilers such as Windows Performance Tools only understand binaries with debug information in PDB files. Your poor MinGW application built with -g, -ggdb, or -gstabs sadly can't be profiled because the profiler simply doesn't understand the integrated debugging information. Usually this means that assembly and/or raw memory addresses appear in the output rather than source code and functions names. Not the easiest way to determine what's happening in your code.

Other profilers such as gprof can be so finicky that it's next to impossible to find the right combination of compile options required for your application to build. Most frustrating, if you do finally discover the incantation needed to build, you're often confronted with runtime failures such as The procedure entry point mcount could not be located... It's maddening if it turns out that gprof just doesn't play nicely with your app.

So I was pleased to discover that the freely avalailable AQtime Standard profiling toolkit from SmartBear Software natively understands .NET, Java, PDB, and MinGW's metadata and debug information. Check out the AQtime screencasts for some great getting started information.

Let's take AQtime Standard for a quick spin to figure out why the following C code performs so poorly. Let's also pretend you've reviewed the source and still can't figure out why it takes so long for the MessageBox to appear.

/* file: slowhello.c
 *
 * build with:
 *     gcc -Wall -O2 -g2 -gstabs+ -o slowhello.exe slowhello.c -luser32
 *
 */
#include <sys/stat.h>
#include <windows.h>

#define STAT_COUNT 50000

void rb_mongo_stat(const char *filename)
{
    int i, rc;
    struct _stat buf;

    for (i = 0; i < STAT_COUNT; i++)
    {
        rc = _stat(filename, &buf);
    }
}

void hello(void)
{
    rb_mongo_stat("slowhello.exe");

    MessageBox(NULL, "Hi Speedy G!", "Pokey", MB_SETFOREGROUND);
}

int main(int argc, char **argv)
{
    hello();

    return 0;
}

Profiling with AQtime follows the pattern typical with most other profilers:

  1. Compile your application with metadata/debug information
  2. Create a "project" in the AQtime tool with profiling setup and configuration information
  3. Run the application to be profiled
  4. Analyze the results

I'll assume you've successfully installed AQtime. If you don't already have a MinGW toolchain installed, swing over to the RubyInstaller project and download the DevKit for a quick and painless install. After following the installation instructions, don't forget to add the DevKit to your PATH environment variable by running somthing similar to:

c:\cdev>\Devkit\devkitvars.bat
Adding the DevKit to PATH...

c:\cdev>

Compiling for Profiling

The only trick here is to ensure you compile with the -gstabs+ build option. For example, compile the example code like:

c:\cdev>gcc -Wall -O2 -g2 -gstabs+ -o slowhello.exe slowhello.c -luser32

c:\cdev>

Creating and Profiling an AQtime Project

The SmartBear's AQtime documentation has more detailed info on how to create a project, but a quick way to create a project is to use the File -> New Project From Module... dialog and select the slowhello.exe app you just built. As this test app is simple and doesn't depend on other custom DLLs you simply need to add the slowhello.exe module to the project.

If your app was more complex and depended upon other custom DLLs you would need to add those DLLs to the project. Although slowhello.exe depends upon msvcrt.dll, kernel32.dll, and user32.dll you do not need (or want) to add these Windows system DLLs to your project.

For a project this simple, no additional configuration is required. Simply press the F5 key, click on the green run icon, or select the Run -> Run menu item to start profiling the slowhello.exe app. After accepting the defaults for a couple of AQtime dialogs, slowhello.exe's dialog box will appear. Click OK and AQtime will complete it's profiling and show it's results in both a Summary tab view and a Report tab view.

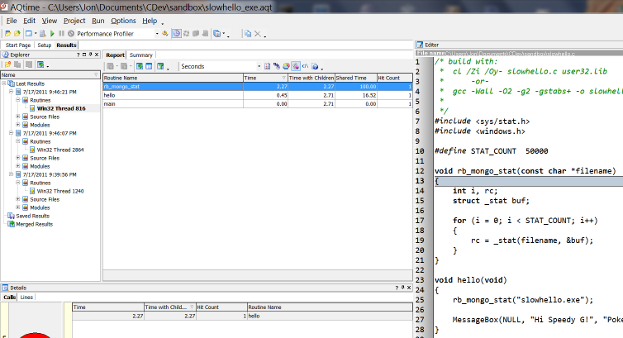
With my AQtime configuration, the results from the Report tab and other views looks like the following.

AQtime slowhello.exe profiling results

While it's almost impossible to read the results, the highlighted line near the middle of the graphic shows that the rb_mongo_stat routine took up the most time with 2.27 seconds followed by the hello routine taking 0.45 seconds. Selecting each routine name changes the information displayed in the source code view on the right and the different views (Disassembler, Parent/Child Details, Call Graph, and Call Tree) at the bottom.

AQtime quickly showed you that the problem child causing MessageBox to be delayed is the rb_mongo_stat function. Time to refactor that implementation to stop unnecessarily stat-ing. A shockingly elusive result I know.

Conclusion

Although this has been a whirlwind summary of how to build and profile a very simple C program with SmartBear's AQtime Standard product, I hope you see how straight forward it can be to begin profiling your MinGW built Windows applications.

Future Post Spoiler

Now that you're a profiling expert with AQtime Standard, it's time to pick up the pace and dig into something a bit more challenging.

# file: override/aqtime_build.rb
# custom build config overrides
if ENV['AQTIME'] then
  puts '[INFO] Overriding to enable AQtime profiled Ruby 1.9.x...'

  RubyInstaller::Ruby19.dependencies = [ :ffi, :yaml, :zlib ]

  RubyInstaller::Ruby19.configure_options << "optflags='-O2'"
  RubyInstaller::Ruby19.configure_options << "debugflags='-g2 -gstabs+'"
end
 
Building Rubinius on Windows - Part 1

I've been meaning to figure out how to build Rubinius on Windows 7 for awhile, but something always seemed to get in the way. You know the story, little things like paying work, business trips, a good jam session, other projects, whatever.

I finally took some time and have made progress solving the puzzle. Thankfully, the Rubinius team has been busy hacking on the core as well as their build environment. There's still a lot to do to make the build environment more usable for Windows Ruby hackers, but I was pleased with how relatively simple it was to progress as far as I did.

While I haven't been able to build Rubinius yet, this post is a snapshot of where I'm at and what I've had to do to get there. In summary:

  1. Install a 1.9 version of the RubyInstaller.
  2. Build a MinGW-w64 version of the DevKit.
  3. Remove the name prefixing from the MinGW-w64 DevKit artifacts.
  4. Prepare your system for building.
  5. Build via ruby configure and rake.

The instructions that follow assume you've already installed and configured a Git client such as MSysGit.

Install the RubyInstaller

If you haven't already done so, install a 1.9 version of the RubyInstaller, add it's bin directory to your PATH environment variable, and make sure you've got the Rake gem installed by typing rake --version. If Rake isn't present, ensure you're connected to the Internet and type gem install rake.

The RubyInstaller is easy to install regardless of whether you use the installer or the 7-Zip archive. If you installed it and tried typing ruby --version in a Command Prompt with no results, drop by our Google Group and ask for help.

Build a Custom MinGW-w64 Based DevKit

One of the features I've built into the RubyInstaller build recipes is the ability to easily create different "flavors" of MinGW-based build toolchains. We're going to take advantage of that feature and build a 32bit, MinGW-w64 based flavor and use it to build Rubinius. To build it, simply do the following:

# clone the RubyInstaller GitHub repository
C:\>git clone git://github.com/oneclick/rubyinstaller.git
  ...

# build your custom DevKit
C:\>cd rubyinstaller
C:\rubyinstaller>rake devkit 7z=1 dkver=mingw64-32-4.5.4
  ...

# find your MinGW-w64 DevKit in C:\rubyinstaller\pkg

Unfortunately, you've got one more tweak to make before the MinGW-w64 DevKit is usable for building Rubinius. You've got to remove the prefixing from the toolchain executable names.

Until the MinGW-w64 standard downloads are available in non-cross-compiling versions, or I update the DevKit build recipes (on my TODO), you'll need to manually strip the name prefixing from the relevant executables in your <DEVKIT_INSTALL_DIR>\mingw\bin directory. Here's a Ruby script and example to help you out.

# file: deprefix.rb
def usage_and_exit(code)
  STDERR.puts 'usage: ruby deprefix.rb ROOT_DIR PREFIX'
  exit(code)
end

usage_and_exit(-1) unless ARGV.length == 2

dir = ARGV[0].gsub('\\', File::SEPARATOR)
prefix = ARGV[1]

usage_and_exit(-2) unless File.directory?(dir)

Dir.glob(File.join(dir, "#{prefix}-*.exe")).each do |f|
  d = File.dirname(f)
  b = File.basename(f)
  puts "renaming #{f} => #{d}/#{b.split(/-/)[3]}"
  File.rename(f, "#{d}/#{b.split(/-/)[3]}")
end

Copy the above script as deprefix.rb into the root directory of wherever you installed your MinGW-w64 DevKit (C:\DevKit-w64 for this post) and run the script like so.

C:\DevKit-w64>ruby deprefix.rb mingw\bin i686-w64-mingw32
renaming mingw/bin/i686-w64-mingw32-addr2line.exe => mingw/bin/addr2line.exe
renaming mingw/bin/i686-w64-mingw32-ar.exe => mingw/bin/ar.exe
renaming mingw/bin/i686-w64-mingw32-as.exe => mingw/bin/as.exe
renaming mingw/bin/i686-w64-mingw32-c++.exe => mingw/bin/c++.exe
...
renaming mingw/bin/i686-w64-mingw32-windres.exe => mingw/bin/windres.exe

C:\DevKit-w64>

Prepare for Building

Next, you need to clone the Rubinius source repository, create a new branch based off of the 2.0.0pre branch, and add the MinGW-w64 based DevKit to your PATH env var like so.


# clone Rubinius and create a branch for hacking
C:\projects>git clone git://github.com/rubinius/rubinius.git
  ...

C:\projects>cd rubinius
C:\projects\rubinius>git checkout -b win-build origin/2.0.0pre
  ...

# add the MinGW-w64 DevKit tools to your PATH
C:\projects\rubinius>\DevKit-w64\devkitvars.bat
Adding the DevKit to PATH...

C:\projects\rubinius>

Build

You're now set up and ready to pull the trigger, so get building!

C:\projects\rubinius>ruby --version
ruby 1.9.2p290 (2011-07-09 revision 32478) [i386-mingw32]

C:\projects\rubinius>ruby configure --with-vendor-zlib
  ...

# see how Rubinius configured itself
C:\projects\rubinius>ruby configure --show

Using the following configuration to build
------------------------------------------
module Rubinius
  BUILD_CONFIG = {
    :which_ruby     => :ruby,
    :build_ruby     => "C:/ruby192/bin/ruby.exe",
    :build_rake     => "rake",
    :build_perl     => "perl",
    :llvm           => :prebuilt,
    ...
    :vendor_zlib    => false,
  }
end

Setting the following defines for the VM
----------------------------------------
#define RBX_HOST          "i686-pc-mingw32"
#define RBX_CPU           "i686"
#define RBX_VENDOR        "pc"
#define RBX_OS            "mingw32"
...
#define RBX_ZLIB_PATH     ""
#define RBX_DEFAULT_18    true
#define RBX_DEFAULT_19    false
#define RBX_DEFAULT_20    false
#define RBX_ENABLED_18    1
#define RBX_LITTLE_ENDIAN 1
#define RBX_HAVE_TR1_HASH 1
#define RBX_WINDOWS 1

# time to build! make a cup of green tea while you wait...
C:\projects\rubinius>rake
  ...

After successfully building for quite awhile you should see the build fail with an error similar to the following. This failure appears to be caused by the fact that the zlib library hasn't been built. This isn't surprising given that ruby configure --show displayed :vendor_zlib => false and #define RBX_ZLIB_PATH "". UPDATE: there appears to be a bug in configure and I've submitted a simple pull request to fix the issue of the zlib library not being built.


...
2: CC vm/vmmethod.cpp
Build time: 461.15241 seconds
1: LD vm/vm.exe
C:/ruby192/bin/ruby.exe -S rake  -r C:/projects/rubinius/config.rb
-r C:/projects/rubinius/rakelib/ext_helper.rb
-r C:/projects/rubinius/rakelib/dependency_grapher.rb build:build
Building bootstrap Melbourne for MRI
CXX bstrlib.c
CXX encoding_compat.cpp
CXX grammar18.cpp
CXX grammar19.cpp
CXX melbourne.cpp
CXX node_types18.cpp
CXX node_types19.cpp
CXX quark.cpp
CXX symbols.cpp
CXX var_table18.cpp
CXX var_table19.cpp
CXX visitor18.cpp
CXX visitor19.cpp
LDSHARED build/melbourne20.so
GEN runtime/platform.conf
rake aborted!
Compilation error generating constants rbx.platform.zlib:
        In file included from C:/projects/rubinius/rbx-ffi-generators-rbx-platform-zlib.c:2:0:
        vendor/zlib/zlib.h:34:19: fatal error: zconf.h: No such file or directory
        compilation terminated.

Tasks: TOP => default => build => build:build => kernel:build => runtime/platform.conf
(See full trace by running task with --trace)

A Wart

While it's really too early for me to discuss the Rubinius build environment warts, one ugly does jump out.

  1. There appears to be no automated way to clean up the build environment as rake distclean doesn't do what you expect it to do. I had to go into each vendor/ sub-directory and manually run either make distclean or make clean depending upon the library. The rake distclean should bring the the source tree back to a pristine state by cleaning the vendor/ subdirectories, while the rake clean target should correctly skip cleaning those subdirectories.

Conclusion

While I've made a lot of progress in building Rubinius on Windows 7, unfortunately I'm not yet able to successfully and repeatedly build the Rubinius project. This likely has more to do with my current unfamiliarity with Rubinius than anything else.

In future posts I plan to summarize what I needed to do to successfully build Rubinius on Windows 7. Meanwhile, if you spot anything that I'm doing wrong or have any suggestions, I'd like to hear from you via email or Twitter.

And I'm sure Brian Ford and others on the Rubinius team would also like to hear about your progress.

 
A Python htdigest Generator

I've recently been testing CherryPy 3.2.0 and looking into their new tool-based support for Digest Authentication. But I didn't have a simple way to generate the correctly formatted lines for CherryPy's built-in get_ha1_file_htdigest function that expects an Apache-styled htdigest-like credentials store file.

Until now.

# file: htdigest.py
import sys
from hashlib import md5

class Options(object):
    pass

def main(opts):
    ht5 = lambda x: md5(':'.join(x)).hexdigest()
    htpwd = ':'.join((opts.user, opts.realm,
                     ht5((opts.user, opts.realm, opts.pwd))))
    print htpwd


if __name__ == '__main__':

    usage = '''
usage: python htdigest.py --user USER --pwd PASSWORD [--realm REALM]
'''

    opts = Options()
    for o in ['--user', '--pwd', '--realm']:
        try:
            setattr(opts, o.replace('--',''), sys.argv[sys.argv.index(o)+1])
        except ValueError:
            pass
        except IndexError:
            pass
    opts.realm = getattr(opts, 'realm', 'default_realm')

    if not hasattr(opts, 'user') or not hasattr(opts, 'pwd'):
        print("[ERROR] must supply both a username and password")
        print(usage)
        exit(1)

    main(opts)

which generates results like:

C:\tools>python htdigest.py --user remi --pwd lerante
remi:default_realm:7076fd3cc727f3c4770ff0bb5905b9d8

C:\tools>

While the helper script simply outputs to stdout, you can use your shell redirectors > and >> to create a new, or append to an existing, htdigest-like credentials store file.

 
Remi LeRante's “Time for msysGit”

I use msysGit every day -- without issue -- on my Win7 system. I also use git every day on my Arch Linux system.

And I'm not the only guy developing on Windows that finds msysGit to be great. By now you're saying “So what's your point Remi!?” The point is that threads like this one have gone well past boring into absolutely annoying.

Why?

Simple. The msysGit downloads still have preview in their filenames eventhough the code has worked solidly for quite awhile. I can understand why the project's contributors might want to be humble and let the code quality speak for itself. But it's quite another thing to hamstring the code by labeling it preview.

It's time for this nonsense to come to an end and for msysGit to hold it's head up high and walk proud.

If you agree, drop over to the msysGit mailing list and tell them what a great job they're doing! And, oh by the way, please drop the preview label from your downloads :)

 
Debugging Native RubyGems - Part 1

As the first in a series on debugging native C RubyGems on Windows using the RubyInstaller's DevKit, this post focuses on a few configuration actions you must take in order to begin the actual debugging session using GDB from the DevKit.

First, if you haven't done so already, install Ruby on your Windows system using one of the RubyInstaller downloads.

Second, ensure you've installed the RubyInstaller's DevKit toolchain. If you're installing it for the first time, read these instructions. No really, read the instructions!

Third, install the rake-compiler gem by typing gem install rake-compiler.

In future posts we'll be building and debugging (on Windows) a native C RubyGem that causes the Ruby interpreter to segfault and crash. Don't worry, the crash is isolated to the Ruby interpreter rather than your Windows system. UPDATE: for those wanting to get a jump on Part 2, here's the oops-null source repo for the native RubyGem, and the source gem is available from rubygems.org. If you want to start debugging it, ensure the DevKit is installed and type gem install oops-null -- --enable-debug.

In general, building native RubyGems on Windows is rather straightforward these days once you've properly configured your RubyInstaller + DevKit environment to take advantage of the rake-compiler. The key remaining technical hurdle is to figure out how to ensure both Ruby and your native RubyGem includes the debugging symbols required for efficient debugging with GDB.

The first one's easy; all of our RubyInstaller downloads are built with debugging symbols included.

However, building your native RubyGem with debugging symbols is a bit more challenging because, by default, symbols are stripped from the native shared library by lines similar to the following found in the gem's mkmf generated Makefile:

# Ruby 1.9.2 build configuration

cflags   =  $(optflags) $(debugflags) $(warnflags)
optflags = -O3
debugflags = -g
...
CFLAGS   =  $(cflags)
...
# NOTE: MRI 1.8.7 has LDSHARED = gcc -shared -s
LDSHARED = $(CC) -shared $(if $(filter-out -g -g0,$(debugflags)),,-s)
...
$(DLLIB): $(DEFFILE) $(OBJS) Makefile
    @-$(RM) $(@)
    $(LDSHARED) -o $@ $(OBJS) $(LIBPATH) $(DLDFLAGS) $(LOCAL_LIBS) $(LIBS)

Is this a bug with MRI Ruby's build configuration? Not at all.

As debugging symbols add size to your shared library, for typical use you want the symbols removed. Also, while you normally want more performance rather than less, the -O3 performance optimization can make it harder to debug the root cause of many problems.

Since this is Just How MRI Ruby Works, you're stuck right? Not really since you're a persistent hacker who rarely takes 'No' for an answer. You puzzle over the above Makefile snippet for awhile, look at the mkmf.rb source code, then decide to include the following little hack (lines 3-8) in the gem's extconf.rb, the file responsible for creating the Makefile which builds and installs the native RubyGem.

require 'mkmf'

# override normal build configuration to build debug friendly library
# if installed via 'gem install oops-null -- --enable-debug'
if enable_config('debug')
  puts '[INFO] enabling debug library build configuration.'
  if RUBY_VERSION < '1.9'
    $CFLAGS = CONFIG['CFLAGS'].gsub(/\s\-O\d?\s/, ' -O0 ')
    $CFLAGS.gsub!(/\s?\-g\w*\s/, ' -ggdb3 ')
    CONFIG['LDSHARED'] = CONFIG['LDSHARED'].gsub(/\s\-s(\s|\z)/, ' ')
  else
    CONFIG['debugflags'] << ' -ggdb3 -O0'
  end
end

create_makefile('oops_null/oops_null')

UPDATE: refactored to work with MRI 1.8.7 and use proper mkmf customization.

NOTE: another option may be to put a similar hack into the gem's Rakefile and count on require's behavior of trying to prevent multiple loads of the same rbconfig file. This could cause other issues, but I've not looked into it.

While you can simply type gem install oops-null -- --enable-debug to build and install the debuggable oops-null native RubyGem, if you've cloned the oops-null source repository you can also build the debuggable gem locally and install it by typing something similar to:


C:\projects\oops-null-git>rake gem
(in C:/projects/oops-null-git)
Temporarily enhancing PATH to include DevKit...
mkdir -p pkg
...
ln Rakefile pkg/oops-null-0.2.0/Rakefile
WARNING:  no rubyforge_project specified
mv oops-null-0.2.0.gem pkg/oops-null-0.2.0.gem


C:\projects\oops-null-git>gem install pkg\oops-null-0.2.0.gem -- --enable-debug
Temporarily enhancing PATH to include DevKit...
Building native extensions.  This could take a while...
Successfully installed oops-null-0.2.0
1 gem installed

Conclusion

While the above hack isn't perfect by any means, adding it to a gem's extconf.rb currently ensures that the gem's native shared library will contain usable debug symbols needed by GDB. While this hack works for your gem's, it doesn't solve the problem when you're trying to debug someone else's native C RubyGem.

In the next post, I'll show you one way to begin debugging (on Windows with GDB) a native C RubyGem that segfault's the Ruby interpreter. Until then, if you've found another clever way to build native RubyGem's with included symbols, I'd like to hear from you. Drop me an email!

 
JRuby, Windows, and C Extensions

You've found a really useful RubyGem but can't use it on your JRuby Windows machine because it's a native C extension. And yes, it's only available in source. And if you did get it to compile, you'd slam face first into the well-known fact that JRuby doesn't work with native RubyGems.

Fahrvergnügen!

"No problem, I'll just port it to Java" says your always-optimistic-but-clueless other self. "Great, another one-off to support" you mutter as reality saunters back into view.

Just about to call it quits, you find this post about some cool Ruby Summer of Code work by Tim Felgentreff. Oddly, you stumble upon the DevKit toolchain for Windows systems, it falls into place, and everything begins to look a little brighter.

But why would anyone do that? Well, one of the JRuby guys has a few words on the matter.

Always the sceptic realist, you decide to see how The Pipe Dream works out with a few of the well-known native RubyGems from the ether.

Turns out, it's as easy as:

  1. Clone JRuby's GitHub repository
  2. Download and install the DevKit
  3. Build JRuby with C extension support
  4. RubyGem install-o-rama!
  5. Smoke test the RubyGems

Cloning JRuby's Repository

Using your existing msysgit installation, type

C:\>git clone git://github.com/jruby/jruby.git jruby-dev
Cloning into jruby-dev...
done.

C:\>

Installing the DevKit

First, download the DevKit and install it to a directory without spaces, say C:\DevKit. Next, run the following after you've updated the DevKit's config.yml file to point to the JRuby repository you just cloned. For more detailed instructions check out the DevKit installation and DevKit upgrade wiki pages.

C:\DevKit>type config.yml
# ...SNIP...
#
---
- C:/jruby-dev

C:\DevKit>ruby dk.rb install
[INFO] Installing 'C:/jruby-dev/lib/ruby/site_ruby/1.8/rubygems/defaults/operating_system.rb'
[INFO] Installing 'C:/jruby-dev/lib/ruby/site_ruby/shared/devkit.rb'

C:\DevKit>

Building JRuby with C Extension Support

Make sure you've setup your Ant+JDK build environment correctly, bring the DevKit's build tools and git onto PATH, and build JRuby via

C:\DevKit>devkitvars
Adding the DevKit to PATH...

C:\DevKit>cd \jruby-dev

C:\jruby-dev>echo %PATH%
C:\DevKit\bin;C:\DevKit\mingw\bin;C:\git\cmd;C:\ant\bin;C:\Program Files\Java\jdk1.6.0_22\bin;
C:\Windows\system32;C:\Windows;C:\Windows\System32\Wbem

C:\jruby-dev>ant clean jar cext
...SNIP...
cext:

BUILD SUCCESSFUL
Total time: 2 minutes 5 seconds
C:\jruby-dev>

Installing Some RubyGems

Ensure your setup is correct by opening a new shell, adding your newly built JRuby to PATH, and running a quick smoke test via

C:\>echo %PATH%
C:\jruby-dev\bin;C:\Windows\system32;C:\Windows;C:\Windows\System32\Wbem

C:\>jruby --version
jruby 1.6.0.dev (ruby 1.8.7 patchlevel 249) (2010-11-30 88ad204) (Java HotSpot(TM)
Client VM 1.6.0_22) [Windows 7-x86-java]

C:\>jruby -e "puts 'Hello from Ruby-on-%s' % RUBY_PLATFORM.capitalize"
Hello from Ruby-on-Java

C:\>jruby -S gem env
RubyGems Environment:
  - RUBYGEMS VERSION: 1.3.7
  - RUBY VERSION: 1.8.7 (2010-11-30 patchlevel 249) [java]
  - INSTALLATION DIRECTORY: C:/jruby-dev/lib/ruby/gems/1.8
  - RUBY EXECUTABLE: C:/jruby-dev/bin/jruby.exe
  - EXECUTABLE DIRECTORY: C:/jruby-dev/bin
  - RUBYGEMS PLATFORMS:
    - ruby
    - universal-java-1.6
  - GEM PATHS:
     - C:/jruby-dev/lib/ruby/gems/1.8
     - C:/Users/Jon/.gem/jruby/1.8

  ...SNIP...

C:\>

Now, let's install the rdiscount and curb gems.

rdiscount is simple enough, but to install curb you need to have already installed curl's header and library development artifacts. As the DevKit is based upon MinGW, a great place to get these development artifacts is from Guenter Knauf who distributes Curl's Windows binaries. Thank him when you get a moment.

Although I use jruby -S gem you can also use just gem if the JRuby bindir is the only (or first) Ruby on your PATH. Note, the --platform=ruby option forces RubyGems to attempt to build the native gem rather than trying to install a gem specifically built for JRuby. For example, EventMachine has a Java specific gem in addition other platform specific gems and a source gem. But that is a topic for a future post.

Moving on...

C:\>jruby -S gem install rdiscount --platform=ruby
JRuby limited openssl loaded. http://jruby.org/openssl
gem install jruby-openssl for full support.
Temporarily enhancing PATH to include DevKit...
Building native extensions.  This could take a while...
Successfully installed rdiscount-1.6.5
1 gem installed

C:\>jruby -S gem install curb --platform=ruby -- --with-curl-lib="c:/curl/bin" --with-curl-include="c:/curl/include"
JRuby limited openssl loaded. http://jruby.org/openssl
gem install jruby-openssl for full support.
Temporarily enhancing PATH to include DevKit...
Building native extensions.  This could take a while...
Successfully installed curb-0.7.8
1 gem installed

C:\>jruby -S gem list

*** LOCAL GEMS ***

curb (0.7.8)
rdiscount (1.6.5)
sources (0.0.1)

C:\>

Smoke Test the RubyGems

Make sure the directory you used with --with-curl-lib containing the curl DLL is on PATH.

C:\>jruby -rubygems -e "require 'rdiscount'; puts RDiscount.new('**Hello JRuby**').to_html"
calling init (63288dd6)
<p><strong>Hello JRuby</strong></p>

C:\>type curbee.rb
require 'rubygems'
require 'curb'

c = Curl::Easy.perform("http://www.google.com")
puts 'URL: %s' % c.url
puts 'IP: %s' % c.primary_ip
puts 'Request Size: %s' % c.request_size

C:\>jruby curbee.rb
calling init (63fc1560)
URL: http://www.google.com
IP: 72.14.204.103
Request Size: 53

C:\>

Yeh!

Conclusion

So what does it all mean? Simply put, a wider spectrum of code reuse options for you as both a developer and user of JRuby on Windows.

One of the more interesting options is the ability to defer, perhaps completely, custom development by enabling you to focus your limited resources on the areas of your product in which you add real value, thereby getting you to 'go-live' faster. For me, JRuby's C extension support is a compelling code reuse and aggregation technology that enhances JRuby's existing integration capabilities.

From that perspective, take another read of both Tim and Charles posts.

Future Post Spoiler

Is it really always this easy? Well, most of the times yes, but sometimes no. There are a few caveats, but they're for a future post. For example, why is the first "failure" not really a failure?

C:\>jruby -S gem install eventmachine --platform=ruby --pre
JRuby limited openssl loaded. http://jruby.org/openssl
gem install jruby-openssl for full support.
Temporarily enhancing PATH to include DevKit...
Building native extensions.  This could take a while...
ERROR:  Error installing eventmachine:
        ERROR: Failed to build gem native extension.

...SNIP...

cmain.cpp:752:20: error: 'fstat' was not declared in this scope
g++.exe: unrecognized option '-EHs'
g++.exe: unrecognized option '-GR'
make: *** [cmain.o] Error 1

C:\>jruby -s gem install eventmachine --pre
JRuby limited openssl loaded. http://jruby.org/openssl
gem install jruby-openssl for full support.
Successfully installed eventmachine-1.0.0.beta.2-java
1 gem installed

C:\>
 
Lua Integration 101

So you want to use Lua to script your C program?

Here's a basic C code skeleton (hosting the Lua runtime) that allows you to run a Lua script via host lua_script.lua with the Lua script able to directly call the say_something function defined in the C host program.

Assuming you have a C/C++ compiler such as the DevKit installed on your Windows box as well as the Lua headers and library, build the executable using something like:

C:\>gcc -Wall -O3 -s -o host.exe -Ic:/lua/include -Lc:/lua/bin -llua51 host.c

C:\>

More details and examples in future posts.

/* file: host.c */

#include <stdio.h>
#include <stdlib.h>

#include "lua.h"
#include "lauxlib.h"
#include "lualib.h"

/* Variable arg function callable from a Lua script as:
 *   say_something('A', 'gaggle', 'of', 5, 'args')
 */
static int
say_something(lua_State* luaVM) {
    int n = lua_gettop(luaVM);
    int i;

    if (n == 0) {
        printf("no arguments");
        return 0;
    }

    for (i = 1; i <= n; i++) {
        if (!lua_isstring(luaVM, i)) {
            lua_pushstring(luaVM, "[ERROR] argument must be a string or a number");
            lua_error(luaVM);
        }
        printf("%s\n", lua_tostring(luaVM, i));
    }

    return 0;
}

static void
print_usage(void) {
    fprintf(stderr, "usage: %s lua_script\n", "main");
    fflush(stderr);
}

static int
check_args(int arg_count, char** arg_strings) {
    if (arg_count != 2) {
        print_usage();
        return(0);
    } else {
        return(1);
    }
}

static void
err_message(const char* msg) {
    fprintf(stderr, "%s\n", msg);
    fflush(stderr);
}

int
main(int argc, char** argv) {
    if (!check_args(argc, argv)) return(EXIT_FAILURE);

    /* Initialize Lua */
    lua_State* luaVM = luaL_newstate();
    if (luaVM == NULL) {
        err_message("Cannot initialize Lua; exiting...");
        return EXIT_FAILURE;
    }

    /* Stop the GC during Lua library (all std) initialization and function
     * registrations. C functions that are callable from a Lua script must be
     * registered with Lua.
     */
    lua_gc(luaVM, LUA_GCSTOP, 0);
    luaL_openlibs(luaVM);
    lua_register(luaVM, "say_something", say_something);
    lua_gc(luaVM, LUA_GCRESTART, 0);

    /* Execute the Lua script */
    if (luaL_dofile(luaVM, argv[1])) err_message("Problem running script.");

    /* Lua cleanup */
    lua_close(luaVM);

    return EXIT_SUCCESS;
}
 
Building Python Exts On Windows

I mainly use distribute or pip to manage Python packages on my Windows machines. And I'm pretty happy eventhough they don't provide many of the features of other package managers.

Nice, but what does that have to do with building Python extensions?

Two very nice Python-based templating libraries Jinja2 and Mako can take advantage of the native code module in the MarkupSafe for increased performance. But you need a way to build MarkupSafe on your Windows system.

Enter the DevKit from the RubyInstaller project. While the DevKit's primary goal is to enable Ruby-on-Window's users to easily build native Ruby extensions, it's also handy as a general purpose Windows-based C/C++ toolchain.

But you also need to find a way to tell pip to use the DevKit toolchain. Running pip install --help shows the --install-option and --global-option options, but there appears to be no way to tell pip which compiler toolchain to use.

Or is there?

First, create the following file in your %USERPROFILE% directory:

# file: %USERPROFILE%/pydistutils.cfg
[build]
compiler = mingw32

...and then execute the following in your shell. Pip uses the DevKit to build and install MarkupSafe and it's native library.

C:\Users\Jon>\DevKit\devkitvars.bat
Adding the DevKit to PATH...

C:\Users\Jon>pip install markupsafe
Downloading/unpacking markupsafe
  Downloading MarkupSafe-0.11.tar.gz
  Running setup.py egg_info for package markupsafe

Installing collected packages: markupsafe
  Running setup.py install for markupsafe

    building 'markupsafe._speedups' extension
    C:\DevKit\mingw\bin\gcc.exe -mno-cygwin -mdll -O -Wall -IC:\Python27\include -IC:\Python27\PC -c markupsafe/_speedups.c -o build\temp.win32-2.7\Release\markupsafe\_speedups.o
    C:\DevKit\mingw\bin\gcc.exe -mno-cygwin -shared -s build\temp.win32-2.7\Release\markupsafe\_speedups.o build\temp.win32-2.7\Release\markupsafe\_speedups.def -LC:\Python27\libs -LC:\Python27\PCbuild -lpython27 -lmsvcr90 -o build\lib.win32-2.7\markupsafe\_speedups.pyd
Successfully installed markupsafe
Cleaning up...

C:\Users\Jon>

UPDATE: This is a known issue with pip on Windows so add your support to the fix request.

Categories
Lua (1)
Python (2)
Go (1)
Ruby (7)